Wednesday 28 November 2012

A Felt Gingerbread House


Ta-da! Welcome to my slightly over the top, kitsch, bordering-on-tasteless felt gingerbread house.

I'm not even going to pretend I made this for, or with, the children. It was all for me. Greedy crafting. I made it over Saturday and Sunday evenings when they were tucked up in bed. I couldn't let them near the glue gun, you see. Too dangerous. Also, they might mess up my bobble trim and button arrangement. 

I'm sorry, but I love it. I really do. It makes me happy just to look at it. I don't have a very good track record with proper, edible gingerbread houses so this was much more satisfying to make. And I can get it out year after year.

***********************************************

I have put together a tutorial below should you fancy making your own. It's the best sort of crafting - minimum effort for maximum effect.

You will need:

  • One cardboard box plus some extra cardboard. The sort of box that deliveries come in works best, rather than trying to make a template. Mine measured 17 x 18 x 25 cm. You need really thick, sturdy cardboard to take the weight of the glue and fabric.
  • 6 sheets of brown crafting felt.
  • Felt scraps in other colours for the doors and windows.
  • 1 metre of bobble trim.
  • 2 metres of lace trim.
  • About 12 drinking straws or pipecleaners.
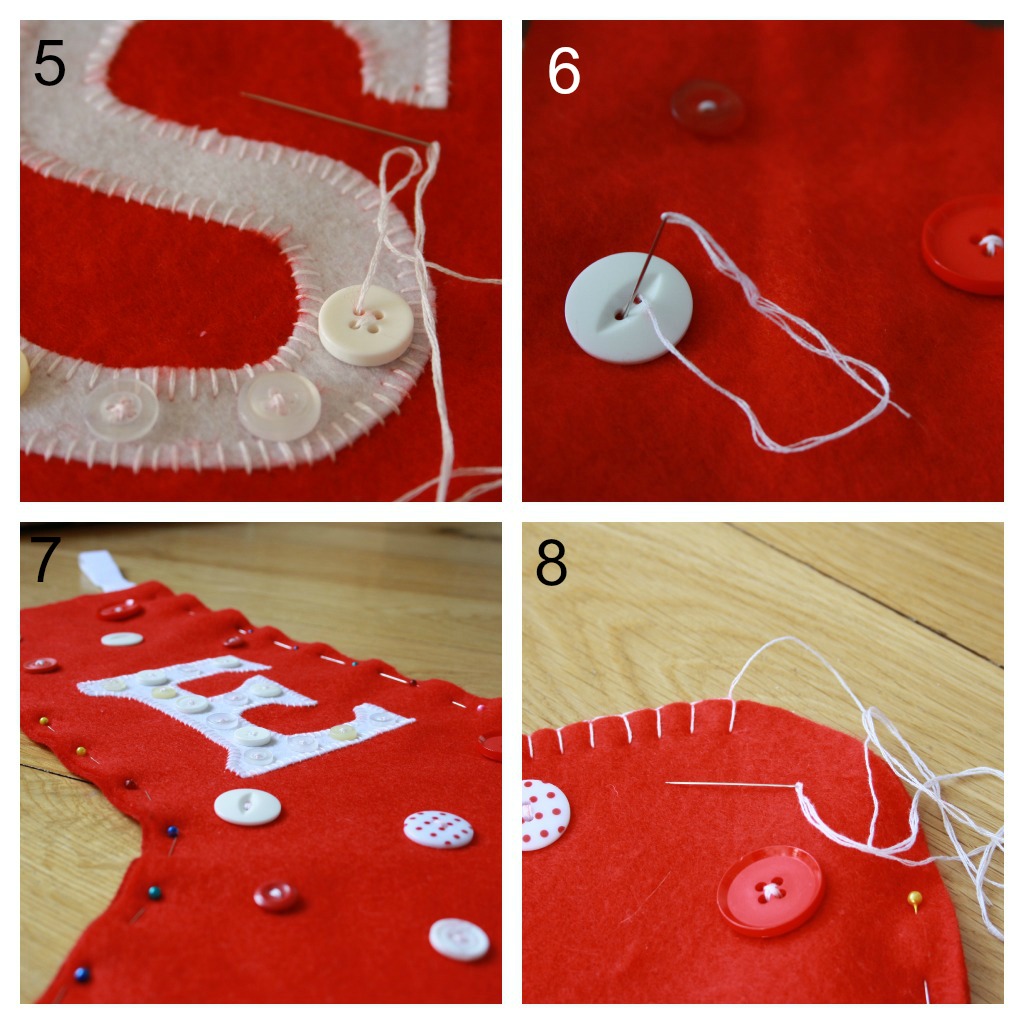
  • Buttons in as many colours as you like. I used 54 on each side so 108 in total.
  • PVA glue. I also used a glue gun to fix the bobble trim and buttons. You could probably do this with PVA, if you're very patient, but the glue gun did make it a whole lot easier.
  • Scissors.

To make:

  • Start by looking at your box and deciding how best to attack it with the scissors. 
  • I cut off the two longer top flaps and cut into the two shorter ones to make the pointy sides. 
  • There was not enough cardboard left from my first box to make the two roof pieces so I went in search of more. I am the sort of person who hoards boxes and bubblewrap and all manner or rubbish in the garage for just this sort of thing. I cut two pieces of cardboard for the roof, making them slightly bigger than the roof hole so that I would have a chalet style over-hanging roof.

  •  Cover the box with felt one side at a time. I roughly measured each piece, cut it and  then used an old child's paintbrush to cover it with PVA glue, then attached it. You can trim the messy edges later.
  • Cover your two roof pieces with felt.

  • Using your glue gun, attach the two roof pieces to the base of the house.
  • Add lace trim around the house wherever you like - I put mine along the roof top, eaves and base of the house.
  • A couple of paper drinking straws hide any untidy joins along the peak of the roof and on each corner.
  • Attach the bobble trim at the base of the roof so that is looks suitably "snowy".


Now, a person with more taste and restraint than me would have stopped here. The contrast of the white lace against the dark brown felt is gorgeous.

But no.

I added felt windows edged with more drinking straws, a front door, a little dog and kennel at the back and many, many buttons on the roof.


Fun was had styling it in a suitably Christmassy fashion. I found this paper tree in the Christmas decorations box in the loft. I searched Angus's box of toy animals for a cute little deer; I had no luck but did come up with this white rabbit. It was that or a polar bear.


Tuesday 27 November 2012

52 Weeks of Happy...7/52

Hello everyone! Happy Tuesday. It is cold and wet here and much of the UK seems to be under water. It's all rather depressing, so thank goodness for 52 Weeks of Happy to keep me smiling. Thank you for the response to my Christmas Stocking post, I so enjoyed reading about all your different traditions and rituals. I had a little flicker of excitement in my tummy yesterday when I went up into the loft to dig out the advent calendar...not long now!

Firstly, my photos - I'm sorry. It's very, very gloomy. Sunlight is scarce and proper daylight only seems to be between 9am and 3pm, and this is reflected in my pictures. So, joining in with the lovely Jen at little birdie, here are my current (and poorly photographed) happy things:


1. Angus made this tealight candle holder at nursery (they have been learning about Diwali, the Hindu festival of lights) and he gave it to me yesterday. It is perfect.

2. Reading The Cat In The Hat with Bella. Her reading is coming along so well and she is keen to try and read everything she sees. Angus has demanded rather a lot of my time and attention lately and my placid, easy-going Bella has suffered. We are making sure we have a lot of "Mummy and Bella time" each day and listening to her read at bedtime is a nice way to do this.

3. Christmas crafting. This half finished t-shirt is for my goddaughter who is currently obsessed with hot air balloons. But what I'm really happy about is that my oldest and best friend, this little girl's mother, gave birth over the weekend, so this sweet girl now has a little sister! I just don't have a photo of that event to show you.

4. Felt bobble trim. How have I never had this in my life before?? I bought a couple of metres for a crafting project (I wanted something "snowy") which, by the way, I am ridiculously proud of and will show you tomorrow, but now I have leftover bobble trim and keep wandering around the house holding it up against lamp shades thinking, hmm, would this be improved by bobble trim? John says NO, emphatically, so my plans are denied.

Have a lovely week, everyone. 


Saturday 24 November 2012

An Easy-Peasy Christmas Stocking


It's true, we can no longer escape the fact - Christmas is coming! 

Here is a quick and easy Christmas project for you; you don't need a sewing machine, you don't need to spend much money, and you could make this in an evening if you put your mind to it. I know it's not December yet, but I know we're all busy and we have to plan ahead with our Christmas crafting.*

************************************

Hanging a stocking on Christmas Eve, ready for Father Christmas/Santa to fill with gifts and treats, is a huge part of a child's Christmas here in the UK.  Do you hang stockings in your house? Or a pillowcase? Over the fireplace or at the foot of the bed? I always love to know what traditions other families, and indeed other countries, have for celebrating Christmas.


In our house, the stockings are hung on the fireplace throughout December, then on Christmas Eve they are taken upstairs and hung on the foot of the children's beds. We fill them with small presents, nothing expensive, and for some reason we always put a satsuma or tangerine in (which never gets eaten), and we always put a sugar mouse right down at the toe. No idea why, but Christmas traditions do become set in stone rather quickly.


This template is based on the stockings I made Bella and Angus last Christmas. I like it as no sewing machine is required. Given that using my sewing machine involves dragging it out from behind the sofa, wiping the dust off it, setting it up on the dining room table only to have to pack it all away every meal time...well, sometimes hand sewing is just so much easier. I've made six now; one each for my children, and four more for friends' children. The two in these photographs are for my friend Lesley's son and daughter, Stanley and Edith (are they not the best names?). I have chosen to decorate my stockings with the child's initial, but you could use any motif like a star, snowflake, gingerbread man, fir tree...

To make one stocking you will need:
  1. Bondaweb or similar fusible interfacing. You only need enough for your initial or motifs.
  2. A cardboard stocking template.
  3. A piece of felt in your main colour measuring around 60cm/24" by 80cm/32".
  4. A small piece of felt in the colour of your initials.
  5. 50cm/20" of ribbon.
  6. Embroidery thread in the colour of your choice.
  7. Buttons to match your two chosen colours.

I found the size worked well - not so skinny that nothing would fit inside them, and not so wide that all the presents slumped down to the bottom. Neither too big or too small. They were, in fact, just right. My stocking measures 18cm/7" wide at the top, is 51cm/20" from top to bottom and is 35cm/14" from heel to toe. But really, so long as it looks stocking shaped and isn't too big or too small, anything goes.

First, using your template, cut two stocking shapes from your main colour felt. (You don't have to use felt, but I like it because it doesn't need hemming, and it feels so soft and Christmassy).


  • Then sketch or trace your initials onto the paper side of the bondaweb (1). Remember to use the reverse of the initial, as you will be ironing it to the reverse of the fabric scrap, and you want it to be the right side up at the end.
  • Iron the bondaweb to your felt or fabric (2). If you are using fabric, remember to iron the bondaweb to the reverse of the material. 
  • Cut out your letter shape, peel away the papery backing layer, then iron the initial to the stocking (3). Iron over a tea towel as the felt scorches easily.
  • Using straight stitch, sew around the letter in an embroidery thread of your choice (4).

  • Sew small white buttons onto the initials, just to add a bit of detail and sparkle (5). 
  • Then sew larger red and white buttons randomly all over the stocking (6).
  • Pin the two pieces of stocking together, securing the ribbon in place at the top with pins at the same time (7). 
  • Using a thread that contrasts to the main colour of your stocking, join the two pieces of felt together with blanket stitch (8).

The ribbon will be held securely in place by the blanket stitch down the side. Trust me, it's enough support for a well stuffed stocking! Lastly, blanket stitch along the top of both front and back pieces, just for decoration. Then hang and hope you've been good enough throughout the year so that Father Christmas pays you a visit.


**********************************************

* I am assuming you like crafting and Christmas. I hope you do, as you'll be seeing a lot of both here over the coming month! 

Friday 23 November 2012

Thrifty Wall Art


I know, I know, it's not original. But it's so pretty!

I've seen fabric framed in embroidery hoops like this everywhere in blogland, on Pinterest, in magazines, and it's popularity lies in it's simplicity and thriftiness. We needed some colour above the sofa in the living room. Grey walls, grey sofa...it's was all getting a bit dismal in the cool November light. I bought small amounts of fabric from Liberty and John Lewis and aimed for a slightly fifties, retro feel to tie in with the room and our tastes. I don't have the deep pockets to buy metres and metres of expensive fabric, but I'm good at buying a fiver's worth and making it go a really long way.

It's not finished. I will add to it over time and let it just grow organically, like a great big happy fabric tree, but I just wanted to show you today.

You just need to carefully cut your fabric to about 1 inch or 3 cm more than your hoop size. Once it's in the frame and you've tightened it, you can either trim the excess fabric with pinking shears, or thread a simple running stitch around the edge and pull it tight and knot. The main thing is that the hoop sits flush against the wall.

***************************************

Happy belated Thanksgiving to my American friends and readers! I hope you had a wonderful day.

Tomorrow is 24th November which means it is one month until Christmas Eve!! I don't know about you, but I still have an awful lot of crafting and shopping and list writing to do before then. But tomorrow I have a very quick and easy Christmas craft project to share with you, something that takes (almost) no time at all but will hopefully make you feel festive and happy.

Thanks for being here and reading and commenting. I've said it before and I'll say it again - you are all very lovely. And a big hello and warm welcome to my new followers - it's good to have you here. 


Wednesday 21 November 2012

A Very Rainy Trip to the Farm


I'd arranged to meet up with my very good friend Debora this morning. She recently moved away to Sheffield so we chose a meeting place half way between Sheffield and Leeds, a farm we'd both been to before with a fantastic playground, cafe, lots to see and do. A place I'd been before (in the summer). Today it was bitterly cold and poured with rain all day. We were the only people in the farm. The cafe was full of older people enjoying tea and cake and sensibly staying inside.

Angus was thrilled to see Debora's youngest son Alex, his little playmate, and they ran around and chattered and screamed and jumped in puddles. They climbed a bit on the wet playground equipment and looked at all the animals and the highlight of the morning was when a tractor drove by and the driver waved at them both. 

Of course we were soaking wet and freezing, but seeing how they loved it did make it bearable. More than bearable. A really lovely day.

Tuesday 20 November 2012

52 Weeks of Happy...6/52

Hello there!

I hope you are all well. Joining in with Jen over at little birdie, here are this week's happy things: 

  • Completing the Leeds Abbey Dash 10k race on Sunday in under an hour, and 7 minutes faster than last year. Woop! Thank you so much for all your support and good wishes for the race, they really meant a lot to me. 
  • Clean sheets. Heaven. I don't get to lie in anymore so I have to go to bed early with books and magazines and luxuriate among smooth sheets, plump pillows and soft quilts.
  • The Christmas magazines. I love them. CHRISTMAS IS COMING!!!
  • Season three of Danish crime drama The Killing started on BBC4 last weekend; we have just watched the second episode. It is superb.
Another small happy which I'll sneak in is the text I received from John this evening, sent around 6 pm while he was on the train: "Do you fancy getting payday takeaway tonight? Beer, pizza and The Killing?" Yes. Yes I did. And that is exactly what we did. 

Saturday 17 November 2012

Jean's Chocolate Cake


All that crafting and stitching, phew, it really takes it out of me. I need cake. 

I'm a bit odd in that I don't really like chocolate cake that much. It's sad, I know. I'm coming to terms with it. Especially not the really rich, chocolatey sort. I find them bitter and dry and bit cloying. But this cake is not overly chocolatey, just chocolatey enough. 

Jean, my mother-in-law, gave me this recipe recently. I tasted her cake and pestered her shamelessly until she kindly wrote it out for me. The original recipe is pictured above; it was given to her by a colleague many years ago and I love the way it is stained with years of use. I do love it when a recipe comes with some history and a bit of a story. The use of oil rather than butter makes for a very moist cake and the separation of the eggs makes it extra light and fluffy. My icing is just a buttercream with some cocoa and nutella added but if you wanted a frosting more, well, chocolatey, you could make something really rich with some melted dark chocolate, maybe more of a ganache.

You need:

For the cake...
140 grams or 5 oz self raising flour
140 grams or 5 oz sugar
30 grams or 1 oz cocoa 
2 tsps baking powder
100 ml or 3.5 fl oz oil (sunflower or vegetable)
100 ml or 3.5 fl oz water
3 eggs

for the icing...
300 grams or 10 oz icing sugar
100 grams or 3 oz butter
3 tbsp milk
1 tbsp chocolate and hazelnut spread

To make:

  • Pre-heat the oven to 160°C or 320°F.
  • Grease and line the bases of two 7" or 8" round baking tins.
  • In a large mixing bowl, combine the flour, sugar, cocoa and baking powder. I used the mixer but you could do this by hand.
  • Separate the eggs.
  • Mix together the oil, water and egg yolks and add to the dry mixture above, mixing well.
  • Whisk the egg whites until peaked.
  • Add the egg whites to the mixture. I took the bowl from the mixer at this point and folded them in by hand.
  • Bake for 20 to 25 minutes.
  • Ice the cake when it is cool (otherwise the icing melts a bit, as I discovered. Greedy old me.)


These cake calories are allowed as tomorrow I am running a 10k race. I am starting to get a little nervous and have that butterfly tummy feeling, the kind you get before an exam. Wish me luck! After the race I plan to lounge on the sofa, crochet and eat mince pies. This will last until New Years Day, then I will get on the scales, go into shock, then go on a diet. That's my usual Christmas routine and I'm sticking to it.


Thursday 15 November 2012

T-shirts and Tea Towels and Sachets, Oh My!


You were all so nice about the bags I made. Thank you.

Can I show you some of the other bits and bobs I made? I have t-shirts for girls and boys. They are bought from the supermarket or online, then perked up with some motifs. The dog and racing car designs are by Cath Kidston, all the others are mine. My absolute favourite is the Liberty print apple on the teal blue background. The photograph doesn't do the colours justice. If it doesn't sell I will give it to Bella. If it does sell, I will make her one anyway. Angus love the fire engine design and, if a three year old could be said to be dropping hints, he is definitely dropping hints ("My like this one. This one for Angus?").

I made some more tea towels, very quick and easy on simple cotton. Tea towels to be used and washed hundreds of times, to get faded and stained and become part of the kitchen.

Lavender sachets..remember the lavender the kids and I picked from the garden back in October? As planned we dried it and made it into little muslin lavender sachets tied with ribbon. Although next time I suggest "quickly" embroidering seven small bags with a lavender motif, someone please slap me around the head with one of these bags.

And lastly, some mulled wine tea bags. When I make mulled wine I empty a bottle of red wine into a saucepan and add a little sugar, a slice of orange, cloves, star anise and a cinnamon stick. When it's warm I have to strain it with a sieve and always end up spilling some and missing a clove which someone ends up swallowing, so I thought...what about a sort-of spice teabag? Something you can fish out and throw away. So I dried oranges and tied ribbon and hey presto. They smell like Christmas. Maybe I could market them as organic room fragrance and charge double the price? Hmmm...

Endless fun was had with my new letter set. I like the wonky, smudged typewriter effect. John asked me if one of the kids had made the labels. They hadn't.

If you made it to the end then thank you for sitting through that. It is so nice to be able to share my winter craft fair makes with you all. Your support and feedback is worth easily as much as a sale! And coming from a girl who spent her career in retail, that's quite a compliment. 

Wednesday 14 November 2012

Some Bunting Bags (Mollie Make Magazine)


I promised I would show you my latest make from Mollie Makes magazine, and here it is...bunting bags. Trying as I am to make one thing from each issue (I am running about five issues behind at the moment, but anyway, moving on...) this little bunting design caught my eye. The pattern is intended for a summer skirt, something to be worn at jubilee fairs and the like, but I thought it would look sweet on a plain calico bag. I'll be honest - it was a bit of a fiddle. Projects like this remind me why I love to hand sew rather than sit hunched over a sewing machine. Tense does not begin to describe my posture while making these tiny flags. But they do look pretty and flap very nicely.

And they inspired me to make some quick and easy applique bunting bags, just perfect for an evening of light sewing in front of the television.


I am hoping to sell these at the craft fairs I mentioned. Any that don't sell will go into the  emergency present drawer. 

I also made eight little bags for small people (well, girls, clearly) and again, any unsold will have some stickers, hair slides and sweets popped inside them and will make handy  (and cheap!) birthday presents. 


Did you notice how I am cleverly preparing myself for not selling much stuff? Craft stalls can be a tricky business and pricing is hard to gauge. Too high a price and people will think "I'm not paying that, I could make that myself!"; too low and it's just not worth the effort involved. But if I can give my makes away as gifts then I tell myself that I've saved money so it's all ok! But really, i do this because I love to make things. Simple as that.

Tomorrow I have for your delectation...handmade t-shirts for girls and boys, some tea towels and other bits and bobs I have made.  Until then, my friends. xx

Tuesday 13 November 2012

52 Weeks of Happy...5/52


Hello there! Thank you so, SO much for your comments on my poppies post. I loved hearing your stories. So many of our families are touched by war and we all have our stories and heroes. And hello to my two new followers, you are very welcome!

Well, it's Tuesday, so joining in with Jen at little birdie here are the little things making me happy lately:
  • Angus the gardener helped my Dad in the garden - don't you just love his pink wheelbarrow? He spent hours testing my Dad's patience to the absolute limit by asking "What doing? What doing? What doing now?" every thirty seconds.
  • Pretty retro fabric.
  • Holly berries on the tree...CHRISTMAS IS COMING!!!
  • Happy children, wellie boots, fresh air, fallen leaves...I love autumn.
We had a really lovely weekend. My parents came to stay and we did a lot of cooking and eating and, judging by the weight of the recycling bin, drank rather a lot of wine too. I managed to get some last minute crafting done ready for my first craft fair on Thursday night. I'll pop back tomorrow with a make from Mollie Makes and some of the other bits and bobs I've been up to. 

Sunday 11 November 2012

Poppies


I wear my poppy* for lots of reasons but mostly because it makes me think of my Grandpa**. He died almost five years ago, when Bella was one. Of course I don't need a poppy to think of him - I think of him very often. We have photographs of him around the house and he is always alive in family conversations and memories. But I deliberately buy and wear a poppy every November; it is my way of honouring him. Like many men his age he fought in World War 2. A navigator in the Royal Air Force, his plane was shot down into the sea of the French coast. He and his pilot were rescued by French fisherman then handed over to the Germans. He was then marched, with others, across Europe to Poland where he spent the remainder of the war in a prisoner of war camp. He endured things I can only begin to imagine and his war experienced shaped him in numerous ways. Some he talked about, some he didn't.

I don't talk about politics much here - it's a very personal and divisive issue. But I am thankful every day that I live in a democracy and have the right to vote and my Grandpa helped defend that right.

Bella is very interested in why we wear poppies and children at her school have been encouraged to bring in a small donation in exchange for a poppy. We've talked (gently) about the armed forces and war and why we believe it's important to remember those who have died for our country and to think about those who are fighting right now.


*************************************************


 * It is customary to wear a poppy in the UK at this time of year to commemorate Remembrance Day, which falls on 11th November every year. A small donation of any value buys you a little paper poppy which you can pin to your coat and all proceeds go towards The Royal British Legion

** He was the best Grandpa ever. He had a beard and smoked a pipe and loved gardening, cricket, and his family. He doted on my sisters and I and some of my happiest childhood memories are of time spent at their house.

Friday 9 November 2012

My Rainy Day Scarf


Well hello! I have a little project to show you today - a very colourful crocheted granny square scarf.

This project was born of my need (and yes it was a need!) for a really super-bright scarf to wear with my black raincoat, bought on a cold and wet day in July in the summer sales. It was supposed to be ready for autumn as it's not really a snuggly cold weather scarf, but I don't appear to crochet fast enough. I chose cotton yarn (so that you don't get that wet wool smell) and made it very long. I really like crocheting in a limited colour palate - I think it shows off the simplicity of the stitches better. This scarf is made up of black, white, grey and hot pink yarn. The pink looks salmon in some shots and orange in others (I blame that November light, not my lack of photography skills), but trust me, it is the most glorious hot, hot pink.

This is my second foray into the world of crocheted scarves, inspired by this one I mad over the summer for a friend. I changed a few details - I added another square and gave the whole scarf a border, and sewed on a fringe instead of tassels - so much quicker and easier! I am converted. I see many more fringed scarves in my future...

*********************************************

For anyone interested, I used Arnell Cotton yarn and a number 3 hook. I made 13 squares (each square was 8 rounds) and sewed them together, then added a border in triple stitch, then fringe at the bottom of each chain stitch.

Thursday 8 November 2012

Good, Good Things

Thank you so much for all your warm wishes and kind words after my last post. You really are such a lovely lot. Angus is quite better (bouncing off the walls, in fact) and, while not sleeping completely through the night as he usually does, is not waking hourly any more. Really, I do take for granted that my two sleep well, and when they stop I just can't cope.

Despite the illness and lack of sleep and general hectic-ness, it's been a very nice week. Some good things that stand out are...

These stunning muffatees I won in a giveaway recenty, knitted by Annie of knitsofacto. Thank you Annie - they are comfortable and warm and complimented upon daily. I modeled them and Angus modeled them, but still we could not take a photograph of them anywhere near as good as yours.    

Cheap supermarket roses in my pretty new bud vases bought in the Tate Britain gift shop are brightening up my sideboard and my mood.


More blog giveaway goodness, from Ellie of Feltabulous; a really beautiful macrame bracelet, a pair of earrings and a very cute felt heart, all handmade by Ellie - thank you, Ellie - you are just too talented, it's not fair!


It was my turn to host book group last night. I do love a mid-week get together. Friends, wine, food, chat, lots of laughing.  Our chosen book was The Hand That First Held Mine by Maggie O'Farrell. Everyone said it was excellent. I have not read it yet - it's been sitting on my bedside table for the last three weeks. I will read it, I will. 


I saw my very good friend Debora yesterday and she said "I bought you a radio". I thought I'd mis-heard her and said, "Err...what?" And yes indeed she had bought me a radio, but not a real one (I have quite a few already) but a biscuit tin shaped exactly like a radio!! What could be more perfect?


Look, see, it's full of biscuits! Debora, vielen dank meiner lieben freundin. 


I have been very busy making and crafting and stitching and will have so many things to show you very soon. I have just finished a granny square scarf for myself in hot pink, black and white and I'm so pleased with it - I will show you tomorrow. I did sneak out tonight for a nice Italian meal and a few glasses of house red with some friends, so it's not all work, work, work.

I hope you are well and all is good where you are. Thank you for being here and for reading. x