Thursday 28 June 2018

Making the Seasons: June


Welcome to my Making the Seasons post for June. Everyone ok? We are all good here but hot, tired and busy. We are of course enjoying the beautifully warm weather but also clinging on until the end of term in three weeks. I feel that, at home and at work, we're reaching that point in the school year where each day feels incrementally busier than the one before, until we reach a final week crescendo of lists, gifts, performances, things to remember, things to do, places to be. It's the same each year and my daily dog walks are a welcome escape when life gets like this. I never really want to take Ziggy out until I'm out, and then I always wish I could walk further and for longer. The heat has meant that I've been going out much earlier in the morning and later in the evening than I usually would, and as I walk I have been noticing all the wild flowers that are growing on the paths around us. I am always confused by the difference between a wild flower and a weed but am happy to appreciate them both. 


Some crafting based around wildflowers seemed like a nice idea for this month's Making the Seasons post, which is a monthly project my friend Lucy of Attic24 are enjoying. There's no real point or end result to it other than just trying to make some time in our busy lives to focus on small and seasonal creative projects, activities which are achievable yet fulfilling, and in tune with the months of the year. I have a lot of crochet on the go at the moment (blankets) and so a small embroidery project seemed like a refreshing change.


One morning this week I picked a selection of flowers and greenery from our local area and brought it home. My rules around picking wildflowers are that I pick very sparingly and only where something is growing abundantly and what I've picked won't show. 


I found some ferns and grasses, daisies (possibly oxeye), an umbellifer of some kind, purple toadflax and a pretty little yellow flowered plant that I couldn't find in my Observer pocket guide. 


I love all those different shapes and textures together, the varying heights and colours, and think they look especially lovely in this old earthenware pot. The umbellifer was quickly removed as I was worried it might be poisonous and also it smelled of wee. 


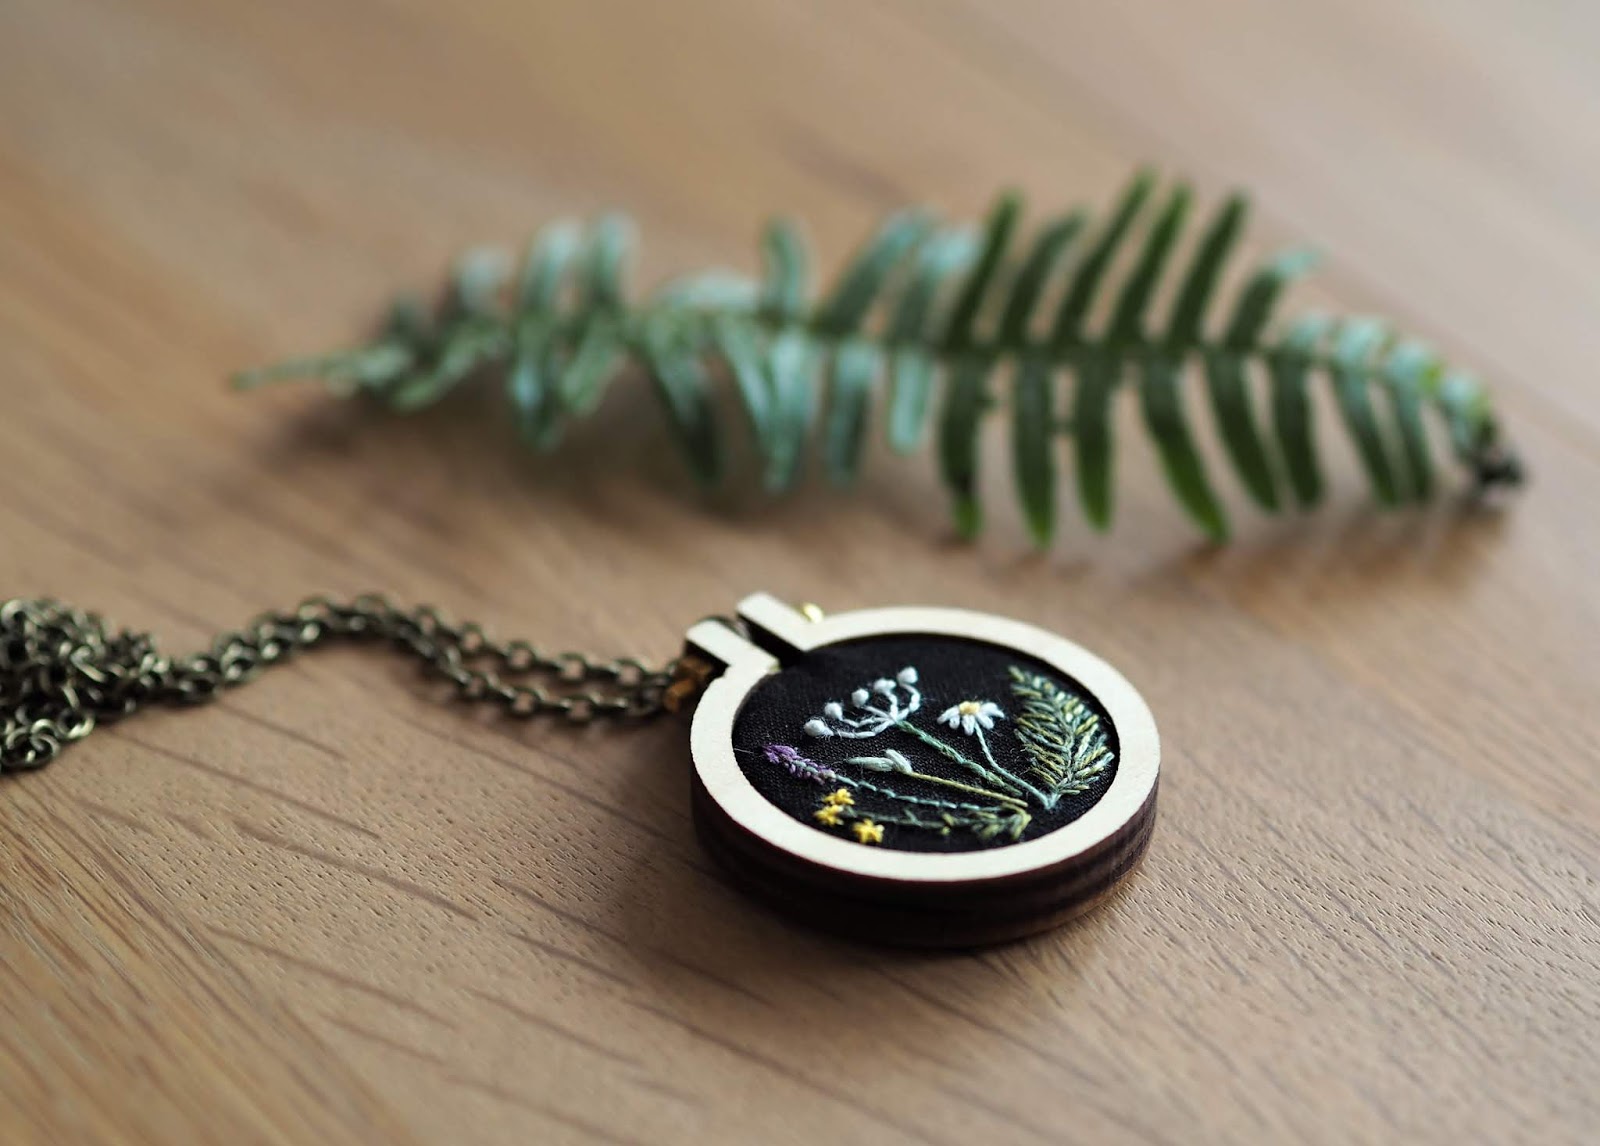
A few weeks ago I'd purchased this miniature embroidery hoop necklace kit but couldn't decide what to stitch, so it had been sitting in my craft basket, but suddenly a tiny wildflower design seemed like the perfect use for it. Remembering this cross stitch and how good the flowers looked against a black background, I found some black cotton in my stash and decided to use that. 


I roughly sketched out a design on paper then copied it onto the fabric, before putting it in a larger hoop as the 4cm is just too small to work with. 


Working on something this small is quite fiddly, but not so much as to make it impossible. I actually quite enjoyed the challenge of trying to make my stitches as small and neat as possible, and the whole thing only took a couple of hours from start to finish. 


When you're happy with your design, you cut the fabric roughly to size and place it over the central disc of wood and then fit the hoop edge around that, then you glue the fabric to the back of the disc. 


Next you cover the messy back of the work by gluing down the back board....


before finally screwing in the bolts and tightening.


I quite like how it came out. It reminds me a little of a botanical illustration, although not a very accurate one, and the colours really pop against the dark fabric. 


But more importantly, the whole process - the walking, picking and arranging the flowers, sewing the tiny stitches - gave me a chance to pause and appreciate the beauty that is around us in midsummer.


Do pop over to Lucy's blog and say hello and read her Making the Seasons post for June. If you'd like to read some of my other ones (we started last October) just click on the Making the Seasons label on the right hand side of my page. 


Saturday 23 June 2018

Colour Block Baby Blanket


I recently finished this baby blanket for a friend at work who's soon to have her second child. When I say recently, I mean that I was darning in the ends on Thursday night ready to give it to her yesterday, on her last day. I am nothing if not motivated by a deadline...it was the same when I was a student, always writing my essays the day before they were due in and leaving things until the last possible moment. 


This blanket was a dream to crochet, providing that elusive balance between being easy enough to work on without much concentration, but with enough colour changes to not be too boring. My friend was equally easy going, not minding what the colours were so long as it was neutral and with a preference for grey. (Some have expressed consternation about the presence of pink in a blanket that might potentially be for a boy and I'm afraid I have no time for this. Are we really still doing all pink for baby girls and all blue for baby boys in 2018?) So I was able to choose my favourite palate of colours; light and dark grey, white, blush pink and mustard yellow. 


I worked the blanket in double crochet (UK terms) all the way through as I just love the subtle texture it creates, and the border is two simple rows of the same stitch


I worked this is cotton yarn which has quite a weight to it, so I didn't need to block this blanket. It has a lovely drape already and folds pleasingly. I'm hoping it be useful for baby to lie on in the summer months, and be wrapped up in as the weather gets colder. And being cotton, it's machine washable and can go in the dryer - very important!


The overall size is 70cm x 100cm. I worked a foundation chain of 100 stitches and then 36 rows in each colour, which was about two and a half balls of each. I used a 4mm hook and Drops Paris cotton DK yarn in the following colours: 16 White, 23 Light Grey, 24 Dark Grey, 41 Mustard, 59 Light Old Pink.


And yesterday I sort agreed to crochet two blankets for two more colleagues who are leaving and moving away at the end of term. Yes, two blankets in four weeks. It can be done, yes? I'm thinking throw size, chunky yarn, big hook. Stripes or ripples, but something without too many ends to darn in. Wish me luck. 


Monday 18 June 2018

Working on the Garden


I've mentioned a few times lately how hard we've been working on the garden over this spring and early summer, and I thought it was time I finally got around to writing a post and showing you some of what we've been up to. You have to bear in mind that our budget is small and our free time is very limited. There isn't much money for new plants, never mind the kind of serious landscaping I would like to do and, given that we have two active children and a very active dog, we are never going to have a perfect lawn. 

The first thing I wanted to do was rescue this sad corner of the garden, which is the most visible from the kitchen window (somewhere I spend a lot of time), and try to turn it into somewhere lovely to look out on.


The trampoline is much used but very ugly, and I knew that we could move it to the opposite corner of the garden where is it screened by some large cordyline plants and palms. At nine and eleven, the children are no longer at an age where I need to be able see them in the garden, and so I was all for hiding the trampoline.


The other issue was the two rotten fence panels behind the trampoline which badly needed replacing, so that was the first job.


Although they don't perfectly match the colour of the existing ones, they are a huge improvement and will blend in over time as they weather. Next, my mum and I cleared away all the wood chip under the trampoline and dug out more flowerbeds, extending the border which runs along the bottom of the garden into the corner.


We were able to take some large shrubs  - two pink toned Red Robin bushes and a euphorbia - from my Grandpa's garden before his house was put on the market, and the others were moved from other parts of the garden. Large plants are so expensive, and I wanted to plant as much greenery as cheaply as possible.

Finally, John laid turf over the remaining patch of bare earth. This has all been happening slowly as you can tell from the plant growth; the fence was replaced at the start of April, the border created at the end of that month, and the turf was laid at the start of May.


I took these photos at the end of May during half term, when the rain had made the grass greener and the beautiful rhododendron bushes were in bloom. As you can see, I have a hard time keeping that straight border straight and I might make it more deliberately curved over time. There is no scheme or idea behind the planting here, I just want to look out on as much green and as little brown as possible, so I'm hoping that the shrubs will grow to cover the earth and fence. I did buy a few Verbena Bonariensis plants as I think they add fantastic height and colour, and the flowers last for a long time. 


The other job we really wanted to tackle was the decked area directly outside the patio doors from our kitchen-diner. We use this space so much, when the weather is warm it really is like having another room. But it was in really bad shape; the decking was unfinished, wobbly in places, covered in mildew and slippery; the parasol cover had torn in high winds; the table and three chairs were so rickety that the chair arms actually fell off when you sat on them; and no-one ever sat on the pink bench as you get spiked by the cordyline and it's also really uncomfortable.


We began by jet washing and staining the decking with some wood stain that would protect the wood and make it less slippery.


We also finished off the edges of the decking, something we'd been meaning to do since we moved in three years ago.


We were able to order a replacement shade for our parasol which I was really pleased about. I love that cantilevered parasol because it provides so much shade and also gives a nice enclosed feeling to the decked area, making it feel even more like a room outside.


We also built a new table and benches. Now, good quality outdoor furniture is really expensive and we just didn't have the budget to go out and buy new everything. But this time last year I saw this amazing table and, the more I thought about it, the more it seemed like this would be an affordable solution. Plus, John was really up for making it. We didn't feel to bad about getting rid of the old garden furniture - it was given to us by some friends when they moved to Australia and was only ever meant to be temporary - so it will become firewood. 

We bought seven scaffolding planks - three for the benches and four for the table - and some hairpin legs from here, choosing four heavy duty white ones for the table and eight smaller yellow legs for the benches.


John cut the planks and glued them together, then fixed them on the underside of the table and benches with batons and screws. Then he sanded the top.


Next the legs were screwed on, then it was all sanded again and given three coats of wood oil to protect it from the elements a little, although I want it to look quite weathered and beaten up over time.


The finished result is so lovely. It is such a sturdy, solid table but the hairpin legs make it look lighter than it is, and the benches are brilliant for seating lots of people.


We eat outside so much more frequently now that we have somewhere roomy to sit and don't always have to carry outside a fourth chair, or wobble bottles precariously on the old sloping table top. It has genuinely made a difference to how we use the garden.


Now, you know I love a before and after photo. Even in the rain, even with a grainy photo taken on my phone, you can see the difference.


It's still evolving though, as the sweet peas I planted in the large grey planted start to grow up the canes. I'm so happy with what we've done and I really hope you enjoyed seeing it come together here.

Wednesday 13 June 2018

ABC Cross Stitch Sampler

I finished the My Sweetiepie ABCs sampler at last, and finally got around to framing and hanging it over half term. It took a long time - two years - which is unusual for me as once I've started a project I usually complete it fairly quickly, but this one was picked up and put down many times over two holidays and lots of evenings.


I like this kind of project because it's large enough to be interesting, but not so huge that you can't ever imagine finishing it, and the many different motifs and pictures stop you getting bored. 


It would usually take me a few hours - spread over days - to complete one letter and image, which is nice because I can usually remember where I was and what I was doing when I stitched it. That octopus, for example, I mostly stitched while staying up late with John one night watching Invasion of the Body Snatchers. And all the other letters below were sewn while on holiday in the Loire Valley in August 2016; I can particularly remember sitting in the shade after lunch one very hot afternoon and sewing that little white envelope.


Most of the house was stitched in the car in February when John and I drove up to Yorkshire and back to celebrate our friend's birthday.


The kettle and daisy below are two of my favourites, lovely to stitch and and to look at. 


And the quilt! I love the quilt. I found that there was something very charming and nostalgic about these little pictures and that they really reminded me of the books of my childhood. I think I like the quilt so much because it reminds me of one in one of the Brambly Hedge books, which I adored as a child. 


I do wonder though if three cross stitched samplers is enough, and maybe it's time for something else, and by that I just mean more embroidery. I have recently become fascinated by embroidery art, most of which I've discovered through Instagram, and there are so many crafters and artists out there producing the most incredible images and patterns with needle and thread. Not all of it is for me, but it's made me realise how much you can do with embroidery and how many different stitches there are which I've never tried, and just what you could do with them. I would like to explore that more.

I bought the pattern from here and the linen from here. I didn't go and buy all the different threads in the pattern (too many!), I just matched them as closely as possible to ones I already had at home unless I really didn't have anything in that colour. I think I bought maybe ten. And isn't it funny how the linen looks quite grey until it's on the grey wall, then it looks much more brown. 

I decided to have a go at framing this sampler myself and while it was fiddly, it wasn't hard, so I've put together a little tutorial below if case you wanted to try it yourself.


How to frame your embroidery

Before you start, iron your embroidery on the reverse side so that you don't crush or damage any of your stitches. You will need a frame (any kind, nothing fancy - mine was an old IKEA Ribba frame), foam board or foamcore (I used this), a sharp knife or scissors, and pins.


Cut your foam board to the size of your frame. I found that drawing around the glass panel or back board is the easiest way to do this. Then position your foam board over the back of your embroidery in roughly the right place.

Flip it over and start tacking pins around the sides, gently pinning the fabric to the side of the foam board. You will want to leave a little room to alter or tighten the pinning. 


You should be able to push the pins all the way in the the foam board so that none stick out around the edge. 


Now go all the way around the edge, adding more pins, smoothing and pulling tight the fabric as you go. You want to pull it was tight as possible without distorting the pattern, so it looks nice and even.


When you're happy, flip it over, tape the excess fabric to the back of the foam board and then put it in the frame.


I chose to remove the glass from the frame, which is just my personal preference; I like being able to touch the fabric - I'm weird like that.


It's certainly not as beautifully done as a professionally framed picture in a made to measure frame, but it saved me money - around £50 I think - and I think it looks pretty good.