
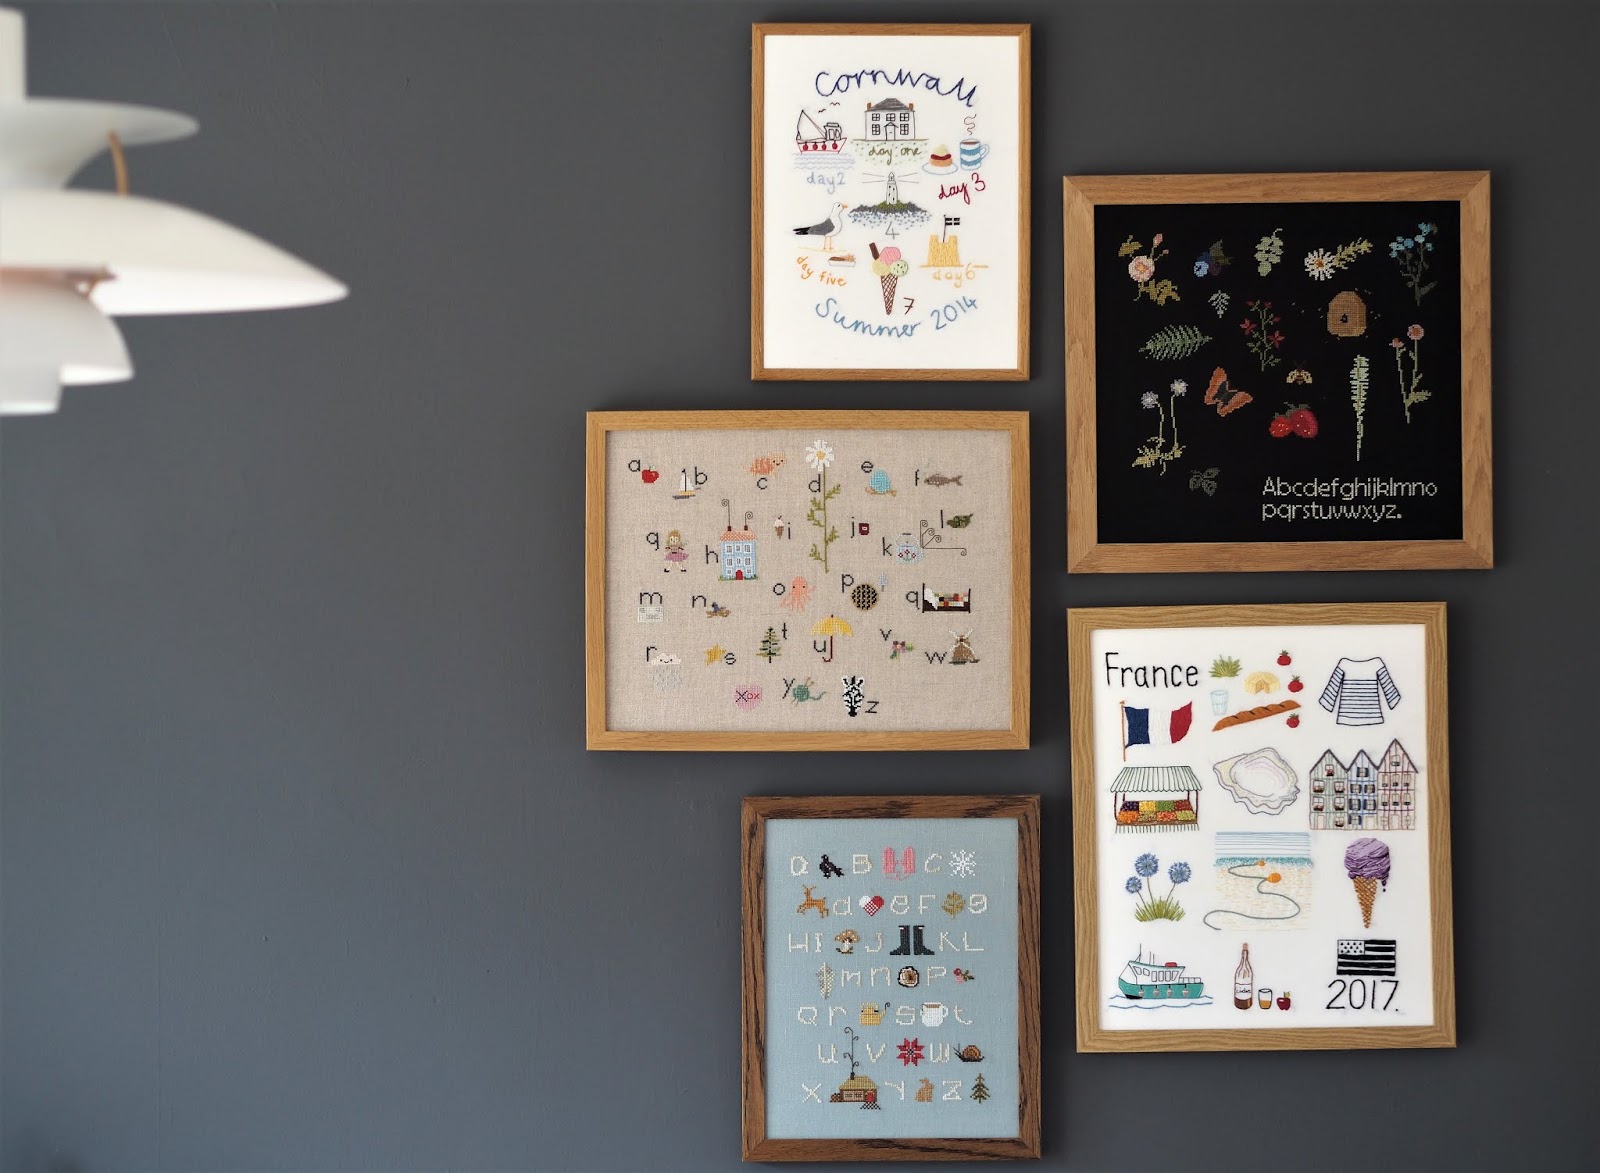
I like this kind of project because it's large enough to be interesting, but not so huge that you can't ever imagine finishing it, and the many different motifs and pictures stop you getting bored.

It would usually take me a few hours - spread over days - to complete one letter and image, which is nice because I can usually remember where I was and what I was doing when I stitched it. That octopus, for example, I mostly stitched while staying up late with John one night watching Invasion of the Body Snatchers. And all the other letters below were sewn while on holiday in the Loire Valley in August 2016; I can particularly remember sitting in the shade after lunch one very hot afternoon and sewing that little white envelope.


Most of the house was stitched in the car in February when John and I drove up to Yorkshire and back to celebrate our friend's birthday.

The kettle and daisy below are two of my favourites, lovely to stitch and and to look at.

And the quilt! I love the quilt. I found that there was something very charming and nostalgic about these little pictures and that they really reminded me of the books of my childhood. I think I like the quilt so much because it reminds me of one in one of the Brambly Hedge books, which I adored as a child.

I do wonder though if three cross stitched samplers is enough, and maybe it's time for something else, and by that I just mean more embroidery. I have recently become fascinated by embroidery art, most of which I've discovered through Instagram, and there are so many crafters and artists out there producing the most incredible images and patterns with needle and thread. Not all of it is for me, but it's made me realise how much you can do with embroidery and how many different stitches there are which I've never tried, and just what you could do with them. I would like to explore that more.
I bought the pattern from here and the linen from here. I didn't go and buy all the different threads in the pattern (too many!), I just matched them as closely as possible to ones I already had at home unless I really didn't have anything in that colour. I think I bought maybe ten. And isn't it funny how the linen looks quite grey until it's on the grey wall, then it looks much more brown.
I decided to have a go at framing this sampler myself and while it was fiddly, it wasn't hard, so I've put together a little tutorial below if case you wanted to try it yourself.
How to frame your embroidery
Before you start, iron your embroidery on the reverse side so that you don't crush or damage any of your stitches. You will need a frame (any kind, nothing fancy - mine was an old IKEA Ribba frame), foam board or foamcore (I used this ), a sharp knife or scissors, and pins.

Cut your foam board to the size of your frame. I found that drawing around the glass panel or back board is the easiest way to do this. Then position your foam board over the back of your embroidery in roughly the right place.

Flip it over and start tacking pins around the sides, gently pinning the fabric to the side of the foam board. You will want to leave a little room to alter or tighten the pinning.

You should be able to push the pins all the way in the the foam board so that none stick out around the edge.

Now go all the way around the edge, adding more pins, smoothing and pulling tight the fabric as you go. You want to pull it was tight as possible without distorting the pattern, so it looks nice and even.

When you're happy, flip it over, tape the excess fabric to the back of the foam board and then put it in the frame.

I chose to remove the glass from the frame, which is just my personal preference; I like being able to touch the fabric - I'm weird like that.

It's certainly not as beautifully done as a professionally framed picture in a made to measure frame, but it saved me money - around £50 I think - and I think it looks pretty good.
Just beautiful, and they all look stunning against the grey wall. Well done on the self framing too; it costs a fortune doesn't it. xx
ReplyDeleteThanks for the framing tutorial - that's really helpful. I made an embroidered holiday diary of our trip to Greece last summer (entirely inspired by yours) and just put it in an IKEA frame. I might go back and reframe it properly now...
ReplyDeleteCan't believe I forgot to include my first thought - what a beautiful addition this is to your embroidery collection! It's gorgeous! X
DeleteBeautifully done, and I'm very impressed with the framing as well. A friend of mine specialises in framing embroideries - his mother is in an embroidery guild and he does all their work, some wonderful things. Have you ever seen Plum Street Sampler's things? They're really pretty and very inspiring. But I know what you mean about embroidery being more versatile. I shall look forward to seeing what you do next, your projects are always amazing. And you've reminded me that I really must dig out my Alicia Paulson sampler and finish it. CJ xx
ReplyDeleteAmazing and done to your usual high standard. Well done for persevering. I frame most of my stuff myself now as the framing part is ridiculously expensive and then it gets treated as something too precious to touch. I’m enjoying the Craftpod kit although I have stalled recently.
ReplyDeleteI love ALL your stitched works on the wall and remember your post about the France one very well, it made me envious of your creativity and talent, wishing I could make something like that about Yorkshire, or the wonderful holidays on Jersey, at Lago Maggiore and in the Black Forest I've been having with O.K.
ReplyDeleteI perfectly understand that you did not want to cover it with glass. Things like that need to be felt, not just seen, I think.
That little octopus is very sweet! The entire sampler is just gorgeous and well done you for framing it yourself, it looks professional. As it is nearly the summer holiday, I am wondering what you will be stitching this year? x
ReplyDeleteI love your framing method - so far I've laced all my cross stitch pics to the board, which is a faff and a half, but your way looks so much easier and your sampler looks lovely. Have a great weekend. Jx
ReplyDeleteLooks lovely. x
ReplyDeleteAnother project well done, Gillian, and I appreciate your tutorial on how you framed your piece...which looks professional to me! xx
ReplyDeleteThank you for this! So helpful, and it looks lovely!x
ReplyDeleteIt's lovely! I agree that there's something very nostalgic about the pictures, it's very comforting to look at! xx
ReplyDeleteIt is fantastic! It makes a great addition to your wall (that secret wall!) Jo x
ReplyDeleteI love this it is so pretty.
ReplyDeleteYou can find good design from http://embroideryartonline.com/ for your project.
ReplyDeleteA little piece of joy! x
ReplyDelete