


I love my filofax. I realise this probably makes me really uncool but I don't mind and every autumn - out of habit as much as anything - I buy a new set of diary inserts and that commits me to using it for another year. I just can't get on with using the diary on my phone; I like to see it all laid out before me, I like to have the pen in my hand while I look over my day, flicking through the pages, counting the weeks.
But my filofax is not pretty. No, it is a brown leather one, old and dull, battered and worn. There is a large ring mark left by a hot cup of tea on the back, and a stain from a time when a pear got squashed in my bag about eight years ago. My grandma gave this to me one Christmas maybe ten or twelve years ago and I'm very attached to it, but it was starting to look shabby.


Something had to be done, and once the seed of an idea of making a cover was planted in my head, that was it, I was off. But goodness me, this was a project and a half, and one I very much wished I had a pattern for. I googled "crocheted filofax cover", I looked on Ravelry, but there was precious little out there. (Also, on a side note, so many crochet patterns and projects are so fussy, girly and country in style. Yarn lovers like modern pattern and colour too, not everything needs a rainbow of colours or a flower stuck on it, although that's nice too sometimes...just saying.)
So I just made it up as I went along really, imagining something like a notebook cover with a flap for the fastening, and decided to use a chevron/zigzag pattern for which I found an excellent tutorial here at the blog Meet Me At Mike's. And what an inspiring blog that is, hurrah for some fresh, modern, un-fussy crochet!
Anyway, it's finished now (it basically took me the entire Easter holiday) and luckily I LOVE it - the colours, the pattern, the neat little stitches. I have a real thing about chevrons lately and have started another project which I'll share soon, I'm only six rows in.
Carry on reading if you're interested in how I made it. It's not a tutorial as such, more me sharing how I did what I did, with photos.
************************************
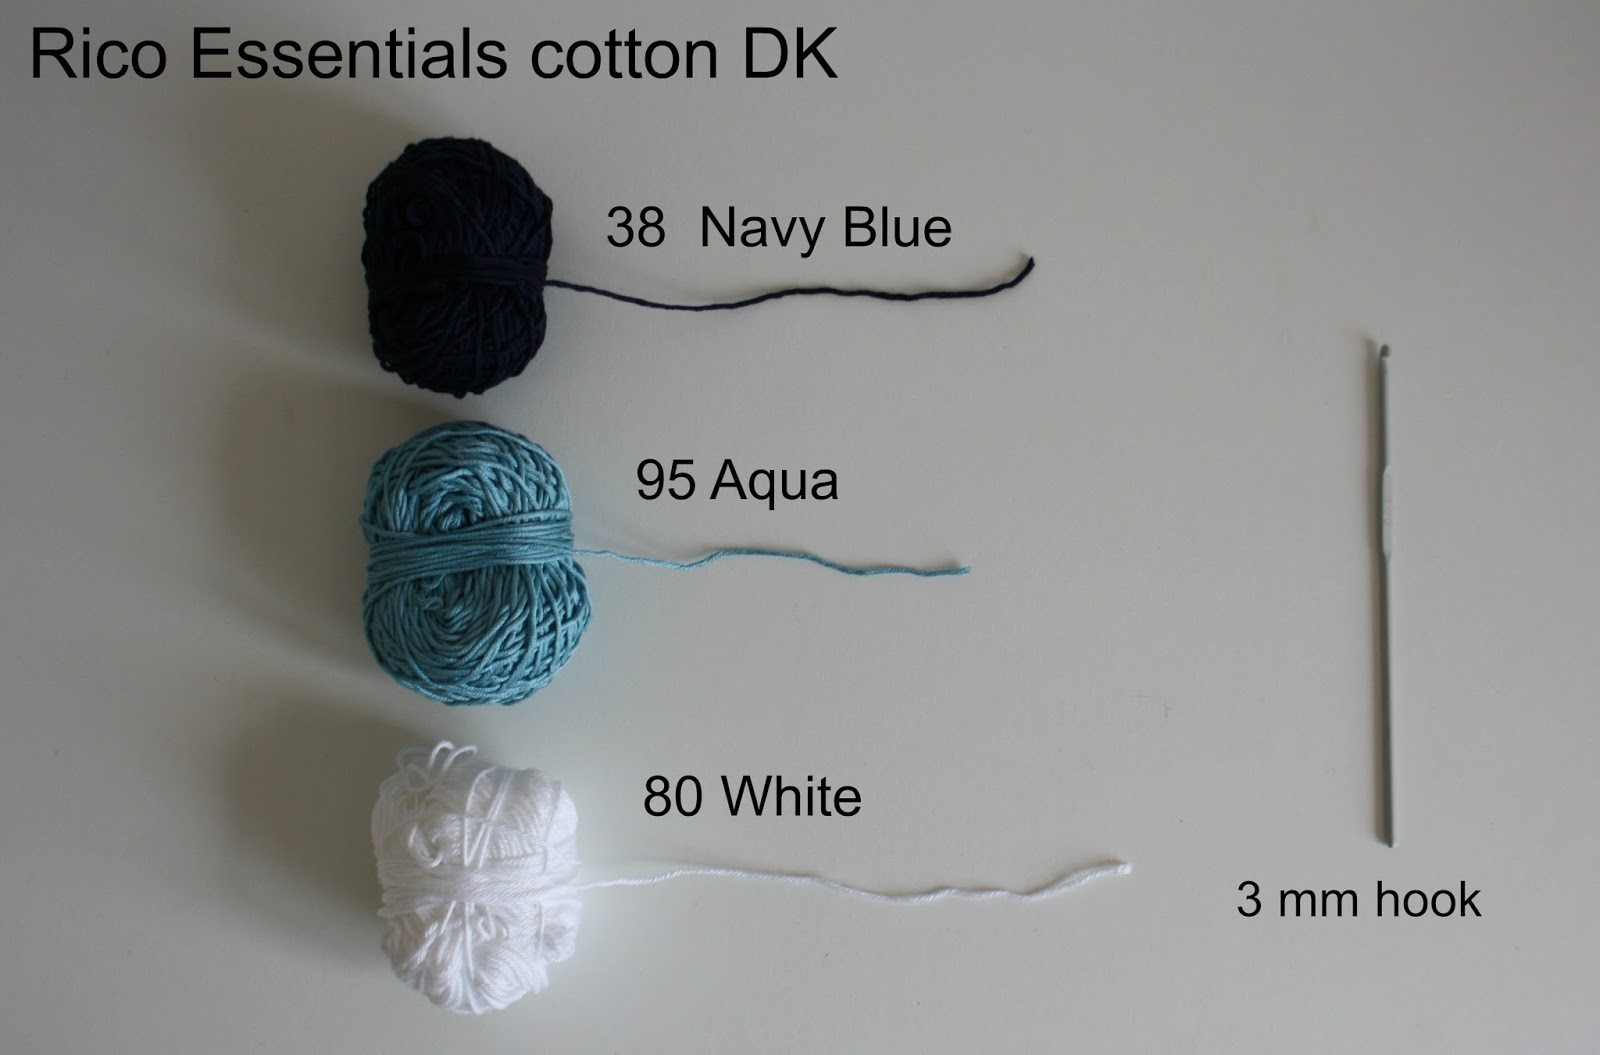
First of all, the essentials. I chose cotton yarn mainly because I had a lot of it already, and I wanted it to be hard wearing and washable. I used this brand, which I really recommend - it has great depth of colour, doesn't split much and it well priced:
I wanted a very closely woven, dense fabric so that when it was stretched tight over the leather you couldn't see the brown showing through. This made it quite hard work to crochet - I had to really force the hook into the stitches sometimes - but I'm glad I made it this way, it feels sturdy and less likely to snag.
Ok, once I'd decided on the pattern and yarn, I needed to make it fit the filofax. I adapted the pattern so that my foundation chain was long enough for my project. However, this being the first time I'd crocheted a chevron, I didn't anticipate how much it would shrink back as I worked the rows. It quickly became clear that it would be much too short, and I had to start again, adding another peak to the row of zigzags. Duh.

Obviously, if you're working in stripes or granny squares, this wont happen, and it should be much easier to gauge how wide you need to make it. Once I was happy with the sizing, I crocheted away until I had a long strip of fabric that I thought I could wrap all the way around my filofax, with enough for flaps either side. Or so I thought...
I suddenly realised that, since my filofax has a flap with popper fastening, I would need to accommodate this into my design, somehow creating an opening into the chevron pattern. This made my brain hurt, but I figured it out. It's hard to explain, and I will do my best: what I had to do was "fill in" one of the dips or valleys in the zigzag so that it had a straight edge. I found a great tutorial here which helped with that a lot. The arrow highlights the area I filled in.

Then I needed to continue back into my chevron pattern in the next row, or else the rest of the pattern would be off. So, above my "filled in" area, I created a chain, a sort of temporary foundation chain, of the number of stitches I needed to make a down-up section, and attached it firmly to either end of my little filled in area.
Then I crocheted along as I had been until I reach my new bit of foundation chain and, instead of working into the tops of the previous row's stitches, worked into the chain instead, and then carried on into the next part of the fabric. This worked in so far as it gave the chevrons an uninterrupted pattern, which is great, but it also gave me a kind of flap, which you can see below:

But this flap just gets tucked inside the cover at the end, so it's fine.
I carried on with my pattern until my piece of fabric was the desired length to go all the way around the filofax with room for flaps at either end. At this point, I darned in the ends and then gave the whole thing a border of two rows of double crochet, just to make the edges nice and tidy.

Now for the cover for the strap. I joined the turquoise colour to the straight edge of my "filled in" valley in the zigzag and then crocheted a strip of fabric that was long enough to cover the strap and wide enough to wrap around it.

Next came the joining it together part. I laid my piece of crocheted fabric flat, placed the filofax on top, and pulled the fabric around it until I was happy it was all equal and straight.

Then, using safety pins as stitch markers, I placed these at the points where I wanted to join the fabric together.

I took a lot of care here to count the stitches and make sure they matched up.

Instead of sewing, I crocheted the two parts together using double crochet stitches, then continued those across the middle section, then carried on joining together on the other side. This gave a nice continuation of the border and a firm edge.
Last of all, that pesky strap. I inserted the filofax into it's cover (it fits, phew!) and then stitched the strap tight all around the strip of leather. You can still take it on and off, but it's not baggy.

And then the fastening. I had no luck with poppers (press studs) and so went off to my local haberdashery in search of velcro. Honestly the women in there know everything. They are officially amazing, slightly scary, but mainly amazing. When I showed them what I was making one of them suggested a magnetic handbag fastener which is a million times easier to fit than a popper, so that's what I did. When I was happy with the positioning I inserted and fixed it, then finished sewing around the last bit of the strap.

I'm really proud of how I got the strap to look, and that fastening. I'm proud of all of it in fact, it was a steep learning curve but sometimes that's a good thing.
And this is what it looks like from the back...

...and the front.

Wow, this is very impressive, Gillian. I love the chevrons and the colors. I agree with you about trying to find crochet accessory patterns that are not overly girly, it isn't easy to do. I really like this and I enjoyed your explanations too. Well done.
ReplyDeleteBrilliant job Gillian!! I like the clean modern look - so in keeping with your personal style. I agree with you about the girly thing, I like that look, but not all the time, I like a mixture of styles, flowers can be good, but so are other things! Hope that you and your Filofax have many more happy years together! Oh, and I am with you on the paper diary thing - trying to do it on my not smartphone phone is a nightmare! xx
ReplyDeleteThat is just brilliant !!! And I LOVE the Diana-colours !!
ReplyDeleteI use a moleskine diary, but seeing this makes me want to restart using my old filofax !
It is so pretty! You picked wonderful colors and did a great job on it.
ReplyDeleteit's amazing, it could almost be a very trendy clutch bag! well done for figuring it out! Heather x
ReplyDeleteIt's terrific! Great job creating it without a pattern.
ReplyDeleteI love it! I'm now eyeing up my filofax (which I have always loved) and wondering what colours I would use to cover it. Thanks for the idea!
ReplyDeleteAbsolutely beautiful x
ReplyDeleteThat looks amazing! And the metal fastener is genius.
ReplyDeleteI too like a paper diary - it is just not the same electronically.
Love this! How clever you are Gillian!
ReplyDeleteSophie xo
That looks amazing - clever old you! Loving the colours - really nice and modern. Coincidentally, I've just made myself a quilted cover for my tablet, but I can't figure out how to fasten the flap down as Velcro is proving impossible to handsew (too stiff, thread getting caught all the time - argh!) - how did you add your metal fastener, was it easy to put on? X
ReplyDeleteYes, it was really easy! It has two metal flaps which you push through the fabric then just push down firmly with your thumbs to secure. This was easy with the crochet as I just wiggled them through the natural holes in the fabric but I think it it was patchwork you'd have to make small holes first, then push the flaps through.
DeleteIncidentally, when I was in my local haberdashery buying the fasteners, they recommended velcro which was stuck on, not sewn. The lady didn't think it would take to the crochet but said it was brilliant for normal material fabric, so that might be an option if sewing it on is a nightmare. x
Brilliant idea.....I still use on diary, i wonder what that makes me! Love your colour choices :) x
ReplyDeleteWow, that made my brain hurt just reading it so I can imagine the thinking power it took! Love the colours - blue and stripy - my favourite combination. x
ReplyDeletebrilliant…just b-r-i-l-l-i-a-n-t!!! I'm a filofax girl, too…..mine is still holding up OK (a little wear and tear, but they are workhorses, aren't they?), but I've bookmarked this great pattern!!!! Thanks!!
ReplyDeleteI think you've done a fab job, Gillian!! It looks very modern with the geometrical pattern! Pati x
ReplyDeleteWow, I knew it looked fabulous but hadn't quite appreciated the brain stretching figuring outness of it. Very well done. I'm hope my chevron cushion will progress quicker once I can tear myself away from HoC!
ReplyDeleteIt's brilliant! x
ReplyDeleteLove it! The colours and pattern are great - funky and stylish. All the work you put in really paid off - it looks like it fits perfectly. Very impressive!
ReplyDeleteMaria x
Fantastic ~ lovely colours!
ReplyDeleteCaroline x
I love the colors you chose, and chevron is so "in" right now! Nice job!
ReplyDeleteThat's fantastic Gillian. I love the colours and you've done such a great job adjusting the pattern to fit with how and what you wanted. Another super make :) x
ReplyDeleteIt is LOVELY Gillian, you're so clever. I really like the colours and pattern, you're right that not everyone wants rainbow colours and flowers all the time. It's so striking. I'm laughing about the squashed pear in your bag, that's happened to me too. Thanks for sharing how you made it. I'm a big fan of writing things down as well. In fact my phone is so simple that it doesn't have a calendar or anything fancy. And anyway, I love notebooks and diaries and calendars.
ReplyDeleteHi Gillian your case is lovely - so clever and perfect colour combination x
ReplyDeleteSuch a great idea! I love the colors and pattern you selected.
ReplyDeleteHey Gillian,
ReplyDeleteOkay that's just blown my mind a bit How clever are you?
Leanne xx
That's brilliant Gillian, what a transformation! Enjoy the rest of your week.
ReplyDeleteJane x
Oh wow! It looks so pretty now! What an idea :) I love making covers and other crochet things you can actually use in daily life. Thanks for sharing the photos of the process!
ReplyDeleteIt's awesome Gillian! x
ReplyDeleteYou've done an amazing job Gillian - it looks very 'with it' to me and I love the colours. How clever you were to work it out, especially the cover for the strap! MY head was hurting just thinking about the whole process! Well done, enjoy it, and your Grandma would be so proud of you! Joy xo
ReplyDeleteI love it too....gives your filofax a whole new makeover.
ReplyDeleteJacqui xx
What a great idea! Very pretty! I need to crochet this for my sketch-book
ReplyDeleteI love the colours, the neat chevron stitches and how it fits your filofax so perfectly. Well done! x
ReplyDeleteThat looks amazing!! The colours are gorgeous and you made it so quickly!
ReplyDeleteHey, that's snazzy! And thank you SO much for the tutorial! So clearly illustrated, the photos are tip-top. I have a filofax too, always will - I need something tactile and in front of my face, that I can touch and scribble in and tick off when I complete a task. Electronic devices don't offer me that satisfaction. And as girlie and pink and flowery as I am, I agree completely with you - there are certain things that just need simple flair, and a filofax is one of those things. I think I might make one in pink and white - still girlie, but functional. Like me! ;-} Chrissie x
ReplyDeletei cannot really comment on the crochet, unskilled as I am in such crafts, beyond saying it is very lovely and incredibly pretty, and also that I love the choice of colours. I can, however, pronounce emphatically that filofaxes are great. I love mine. It is A5 mustard leather and having had a few years of electronic calendars I rediscovered paper-based planning and am in heaven. I have a matching (refillable) a5 notepad too - so I must be excruciatingly uncool (although I suspected that already). The ordering and inserting of new pages is a lovely, cathartic process. Long live the filofax (I shall go away now) x
ReplyDeleteHey, lovely sister? Please can you make me one?? I love the chevron pattern! I don't have a filofax but have wanted one for a while... XXX
ReplyDeleteIt looks great, you're very talented, I wouldn't know where to start.
ReplyDeleteWonderful. great choice of colours, I too cant survive without my Filofax, my eldest daughter keeps telling me they are so old fashioned but I don't care .I use my iphone but I still love to write things done.You have made a thing of beauty
ReplyDeleteThis is amazing, such a great idea to brighten up a practical everyday object. I can't not have a diary either, I need to be able to flick back and forth and to write things down.
ReplyDeleteYou are brilliant, I love this so much. Well done my friend.
ReplyDeleteMeredith
Oh wow, I am so impressed. You are a designer! This was a great tutorial Gillian, and your crotchet is so good. I love these colours too, the cover looks contemporary and professional, not twee at all. I have a Filofax but have moved my diary to my iPad (which was provided by work), it's so others can see it, but I did used to love my Filofax. I should give it away really. Have a lovely long weekend. Xxx
ReplyDeleteThat's really clever!
ReplyDeleteAh, this is gorgeous! Love it.
ReplyDeleteDiaryGirl
Awesome & I love the colours & your pattern.
ReplyDeleteI have a boring black A4 Filofax that I'd love to be able to do this to, but my crochet skills are very basic.
You're very talented :)
Gosh, the two things I love are planners and crochet. This is COOL!
ReplyDeleteThis is very original and I love the colours, hence my blog name. As someone who is getting to grips with crochet I think this is excellent and without a pattern too, very clever as i would not be sure where to start.
ReplyDeleteOh wow, that's impressive! Great idea!
ReplyDeleteIt's really great Gillian ... I love the colours and it is such a perfect fit ... very clever ... Bee xx
ReplyDeleteI love to read anything yarn or Filofax related, and here I have both. A wonderful post and a beautiful project. Thanks for the detailed description.
ReplyDeleteHi, Gillian! I came here from Attic24 and I´m totally in love with your blog (the posts, the images, the colours, the organization and the vibrant way you put things). :)
ReplyDeleteBest regards from Brazil
Thanks for this! I've been skming the internet trying to figure out how I want to crochet my cover for my Saffiano. Beautiful work here! Will implement some of the ideas.
ReplyDeleteIt won the 1961 SCCA B-Production National Championship,
ReplyDeleteand was inducted into the Corvette Hall of Fame and
the Bloomington Gold Hall of Fame. After making the cut they went on to define an issue that affected the
world and to develop a strategy. It will support USB2 AND USB3,
have 512GB of solid-state storage, and a 720p Face - Time HD camera.
Also visit my blog post :: Csr Racing Hack Android
This is a good tip especially to those fresh to the blogosphere.
ReplyDeleteShort but very accurate info... Appreciate your sharing this one.
A must read post!
Yes please. I sit here licking my wounds.
ReplyDeleteIt's appropriate time to make a few plans for the long run and it's time
ReplyDeleteto be happy. I have learn this submit and if I could I want to suggest you some fascinating issues or tips.
Maybe you could write subsequent articles regarding this article.
I wish to learn even more issues approximately it!
I take pleasure in, cause I discovered just what I used to be taking a look for.
ReplyDeleteYou have ended my four day long hunt! God Bless you
man. Have a great day. Bye
You recognize, you are right. Most blog comments DO suck.
ReplyDeletecasino games
ReplyDeleteslot online
kasino
online casino gambling
casino online